
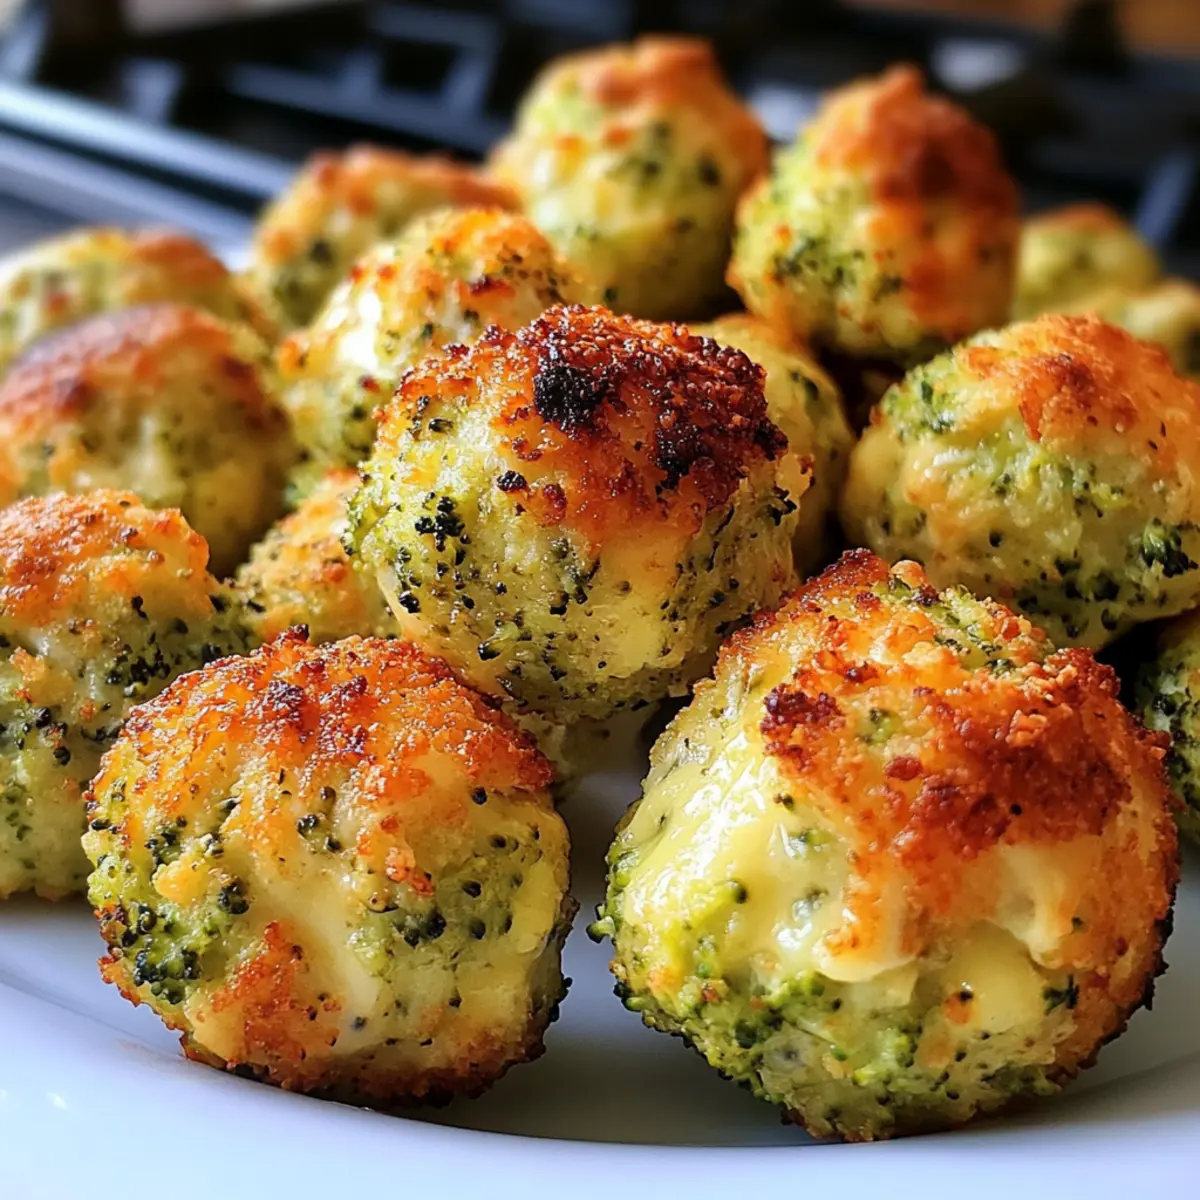
Baked snacks often evoke memories of cozy gatherings and laughter, but they don’t always have to come with a calorie overload. Enter my Baked Broccoli Cheese Balls, a delightful twist on classic comfort food! These crispy, cheesy bites are not only kid-friendly but also an easy, nutritious option for anyone yearning to ditch fast food for something wholesome. With a perfect blend of creamy cheddar and zingy Parmesan, these little gems sneak a satisfying serving of broccoli into each tempting mouthful. Plus, they come together in a flash, making them a great choice for busy days or impromptu snacking. Are you ready to make snack time a little more exciting? Let’s dive in!

Why Are These Broccoli Cheese Balls Irresistible?
Kid-friendly and packed with nutrients, these Baked Broccoli Cheese Balls are a healthy way to sneak veggies into your family’s diet without a fuss. Quick preparation means you’ll have these cheesy delights ready in no time, perfect for spontaneous snacking! Versatile enough for meal time, they can also shine as party appetizers. Delicious blend of cheddar and Parmesan creates a rich, savory flavor that everyone will love. Serve with your favorite dipping sauce, and you’ll have a crowd-pleaser that rivals even the finest fast food options! Plus, you can experiment with flavors by adding herbs or trying different cheeses, just like in my delicious Cottage Cheese Garlic Naan recipe!
Baked Broccoli Cheese Balls Ingredients
For the Mixture
• Broccoli florets – A nutrient-packed veggie that adds flavor; you can substitute with other finely chopped vegetables for variety.
• Breadcrumbs – Acts as a binding agent; try gluten-free breadcrumbs for a delicious gluten-free alternative.
• Shredded cheddar cheese – Offers a creamy texture and rich flavor; mozzarella or pepper jack can be a fun twist.
• Grated Parmesan cheese – Adds sharpness and depth to the taste, enhancing the cheesy experience.
• Eggs – Essential for binding everything together and ensuring a perfect texture.
• All-purpose flour – Helps with binding and gives the balls a pleasant consistency.
For Seasoning
• Garlic powder – Brings an aromatic touch to every bite, giving it that savory punch.
• Onion powder – Adds an extra layer of flavor to elevate the overall taste.
• Salt and pepper – Essential seasonings to enhance the taste of Baked Broccoli Cheese Balls.
For Preparation
• Cooking spray – A must for greasing the baking sheet, making the clean-up process that much easier!
Step‑by‑Step Instructions for Baked Broccoli Cheese Balls
Step 1: Preheat the Oven
Begin by preheating your oven to 400°F (200°C) to ensure it reaches the ideal temperature for baking. While the oven warms up, prepare your baking sheet by lining it with parchment paper or lightly greasing it with cooking spray. This step is crucial for preventing your delicious Baked Broccoli Cheese Balls from sticking.
Step 2: Steam the Broccoli
Take your fresh broccoli florets and steam them until they’re tender-crisp, which should take about 3 to 5 minutes. You want them bright green but not mushy; a good visual cue is when they’re vibrant yet firm. Once steamed, allow the broccoli to cool before finely chopping it for better texture and easier mixing in the later steps.
Step 3: Combine the Ingredients
In a large mixing bowl, combine the finely chopped broccoli with breadcrumbs, shredded cheddar cheese, grated Parmesan, eggs, and flour. Add in the garlic powder, onion powder, salt, and pepper. Use a fork or your hands to mix these ingredients thoroughly until well combined, forming a cohesive mixture that’s ready to be shaped into balls.
Step 4: Form the Cheese Balls
Using your hands or a cookie scoop, shape the mixture into 1-inch balls. This size is perfect for achieving that ideal crispy exterior and warm, cheesy center. Make sure to pack them well to hold their shape during baking. Once formed, place the balls on the prepared baking sheet, giving them enough space to allow even cooking.
Step 5: Bake the Broccoli Cheese Balls
Transfer the baking sheet containing the Baked Broccoli Cheese Balls into the preheated oven. Let them bake for 20 to 25 minutes until they turn a beautiful golden brown, indicating that they are crispy outside. For an extra touch of crispiness, you can broil them on high for an additional 1 to 2 minutes, but keep a close eye on them to avoid burning.
Step 6: Cool and Serve
After baking, remove the Baked Broccoli Cheese Balls from the oven and allow them to cool slightly on the baking sheet. This resting period helps them firm up a bit more. Serve them warm as a delightful snack, alongside your favorite dipping sauce like marinara or ranch for added flavor.

Baked Broccoli Cheese Balls: Fun Variations!
Feel free to let your creativity shine while making these scrumptious bites, and try out these delightful twists!
- Dairy-Free: Substitute dairy cheeses with vegan cheese alternatives for a delicious plant-based option.
- Spicy Kick: Mix in chopped jalapeños or a pinch of cayenne pepper for those who enjoy a little heat with their snacks! Feel the spice enhance every cheesy bite.
- Herb-Infused: Toss in fresh herbs like dill or cilantro to add a bright, refreshing flavor that harmonizes beautifully with the cheeses.
- Nutty Crunch: Add finely chopped nuts such as walnuts or almonds for added texture and a delightful crunch, transforming the bites into a nutty wonder!
- Veggie Boost: Mix in other finely chopped vegetables, like bell peppers or spinach, to increase the nutrition and flavor depth. Each bite will be a surprise full of color and taste.
- Cheese Variety: Swap in different cheeses like feta or gouda to explore new flavor profiles. By doing this, you expand the cheesy goodness and keep things exciting!
- Protein-Packed: Add cooked quinoa or chickpeas into the mix for an extra protein punch. These ingredients increase the nutritional value while keeping the treats filling.
For even more delightful recipes, don’t forget to check out my Pumpkin Cream Cheese or Cottage Cheese Garlic dishes for tasty inspiration!
How to Store and Freeze Baked Broccoli Cheese Balls
Fridge: Store your Baked Broccoli Cheese Balls in an airtight container for up to 3 days. This keeps them fresh and ready for a quick snack or meal.
Freezer: For longer storage, freeze the cheese balls in a single layer on a baking sheet, then transfer to a freezer-safe bag or container for up to 3 months. This way, you can enjoy them any time!
Reheating: To reheat, bake at 350°F (175°C) for about 10 minutes until warmed through and crispy again. You can also use the microwave for a quick option, heating them for 30-60 seconds.
Make-Ahead Tip: You can prepare the mixture ahead of time and refrigerate it for up to a day. Just shape into balls right before baking to enjoy fresh Baked Broccoli Cheese Balls whenever you’re ready!
Expert Tips for Baked Broccoli Cheese Balls
• Chop Broccoli Finely: Ensure the broccoli is finely chopped to maintain a pleasing texture and even distribution throughout the cheese balls.
• Don’t Overcrowd: Leave space between the balls on the baking sheet for even cooking and that perfect crispy exterior; overcrowding can lead to soggy results.
• Mix Well: Make sure to mix the ingredients thoroughly. A well-combined mixture helps the Baked Broccoli Cheese Balls hold their shape and achieve uniform flavor in every bite.
• Drain Excess Moisture: If your broccoli seems wet after steaming, gently pat it dry before mixing to prevent sogginess in your finished snacks.
• Experiment with Cheese: Feel free to mix up cheeses! Substituting mozzarella or spicy pepper jack will add new flavors to your Baked Broccoli Cheese Balls, appealing to varied tastes.
What to Serve with Baked Broccoli Cheese Balls
Dive into a culinary adventure where every bite invites warmth and satisfaction on your table!
- Creamy Garlic Mashed Potatoes: The smooth, buttery texture pairs beautifully, enhancing the savory cheese flavors of the broccoli balls.
- Crunchy Caesar Salad: Crisp romaine lettuce drizzled with tangy dressing adds a fresh contrast, brightening your meal as a side.
- Spicy Marinara Sauce: A zesty dip that elevates the flavors of the cheese balls, making each bite an exciting experience.
- Zucchini Noodles: Light and healthy, these noodles provide a delightful base that balances the richness of the cheesy balls.
- Vegetable Platter: Assorted fresh cut vegetables offer a colorful crunch that complements the savory profile without overpowering it.
For a drink, consider a Chilled Lemonade; the refreshing tartness cleanses the palate perfectly after the rich bites. Enjoy these pairings for a fulfilling and vibrant meal!
Make Ahead Options
These Baked Broccoli Cheese Balls are perfect for meal prep enthusiasts! You can prepare the mixture up to 24 hours in advance; just store it in an airtight container in the refrigerator to keep the ingredients fresh. When you’re ready to bake, simply roll the mixture into balls and proceed with baking as per the instructions. Alternatively, you can roll the balls and freeze them for up to 3 months before baking. Just place them in a single layer on a baking sheet to freeze before transferring to a freezer-safe container. To maintain their delightful quality, bake from frozen at 400°F (200°C) for 25-30 minutes until golden brown, ensuring a delicious and crispy snack with minimal effort when time is tight!
Baked Broccoli Cheese Balls Recipe FAQs
How do I choose the best broccoli florets for the recipe?
Absolutely! Look for bright green broccoli florets free from dark spots or yellowing. They should feel firm and fresh to the touch. If you can, choose smaller heads, as they tend to be more tender and flavorful.
What is the best way to store leftover Baked Broccoli Cheese Balls?
You can store your Baked Broccoli Cheese Balls in an airtight container in the fridge for up to 3 days. This keeps them fresh and ready for a quick snack or meal without losing their delightful texture.
Can I freeze Baked Broccoli Cheese Balls for later? How?
Sure! First, place the balls in a single layer on a baking sheet lined with parchment paper and freeze until solid (about 1 hour). Afterward, transfer them to a freezer-safe container or bag. They can be kept in the freezer for up to 3 months. Just remember to reheat them by baking at 350°F (175°C) for about 10 minutes for the best texture!
What should I do if my mixture is too wet or too dry?
If your mixture feels overly wet and hard to form into balls, try adding a bit more breadcrumbs or flour, one tablespoon at a time, until you achieve the right consistency. On the other hand, if the mixture is too dry, a splash of water or an extra egg can help moisten it up, improving moldability without compromising the flavor!
Are there any allergy considerations for the Baked Broccoli Cheese Balls?
Yes! If you’re making these for someone with dietary restrictions, be mindful of the ingredients. The recipe contains dairy (cheese) and eggs, so you can substitute with plant-based cheese or egg replacers if needed. If gluten is a concern, opt for gluten-free breadcrumbs and flour for the perfect alternative.
Can I prepare the Baked Broccoli Cheese Balls in advance?
Certainly! You can make the mixture and store it in the refrigerator for up to a day before baking. Just remember to shape them into balls shortly before baking to ensure maximum freshness and that hit of delicious crispiness when served!

Baked Broccoli Cheese Balls: Cheesy Goodness Your Family Will Love
Ingredients
Equipment
Method
- Preheat the oven to 400°F (200°C) and prepare the baking sheet with parchment paper or cooking spray.
- Steam broccoli florets until tender-crisp for 3 to 5 minutes. Finely chop them once cooled.
- In a large mixing bowl, combine chopped broccoli, breadcrumbs, shredded cheddar, grated Parmesan, eggs, and flour. Add garlic powder, onion powder, salt, and pepper, and mix well.
- Shape the mixture into 1-inch balls and place them on the prepared baking sheet with enough space in between.
- Bake in the preheated oven for 20 to 25 minutes until golden brown, optionally broiling for an additional 1 to 2 minutes for extra crispiness.
- Let the cheese balls cool slightly on the baking sheet before serving with your favorite dipping sauce.
Leave a Reply